Optimizing Algorithms for Bitcoin Script (part 2)

After completing the first round of optimizations for SHA256 using the techniques described in the previous article (which is recommended to read before this one), I realized that to further optimize the algorithm, or to tackle others, I needed a tool that would simplify the process of writing Bitcoin Scripts. The two main difficulties I faced were debugging the scripts when there was an issue and determining the position of certain elements on the stack.
Around that time, I traveled with the BitVMX team to bitcoin++ conference in Austin. There, I saw an excellent presentation by Johan Halseth, where he demonstrated a command line tool that enabled step-by-step debugging of Bitcoin Scripts while showing the stack and the alt-stack for large scripts 🤯. It was really inspiring, and I would have probably used it, but it was written in Go. Since we are using Rust as our main language, and I also wanted the tracking functionality I started writing my own tool: bitcoin-script-stack.
Existing Tools
Before diving into the library, let’s take a look at the tools that were available and I used to optimize SHA. One such tool is the scriptwiz app. It allows you to write scripts with syntax highlighting and shows the stack state after executing each opcode. I still use it when I need to test some small script, but the problem I encountered is that it starts becoming unresponsive as the script grows, and the horizontal scroll to view the stack becomes difficult to use. Although the project is open source, it is not actively maintained.
The other option is to use Rust bitcoin-scriptexec library, written by the BitVM team, which allows for programmatically writing scripts, using loops, conditionals and functions, and then executing the resulting script. However, debugging scripts with this library proved to be a bit challenging.
Bitcoin Stack Tracker
So let’s take a look at my library and the possibilities it offers.
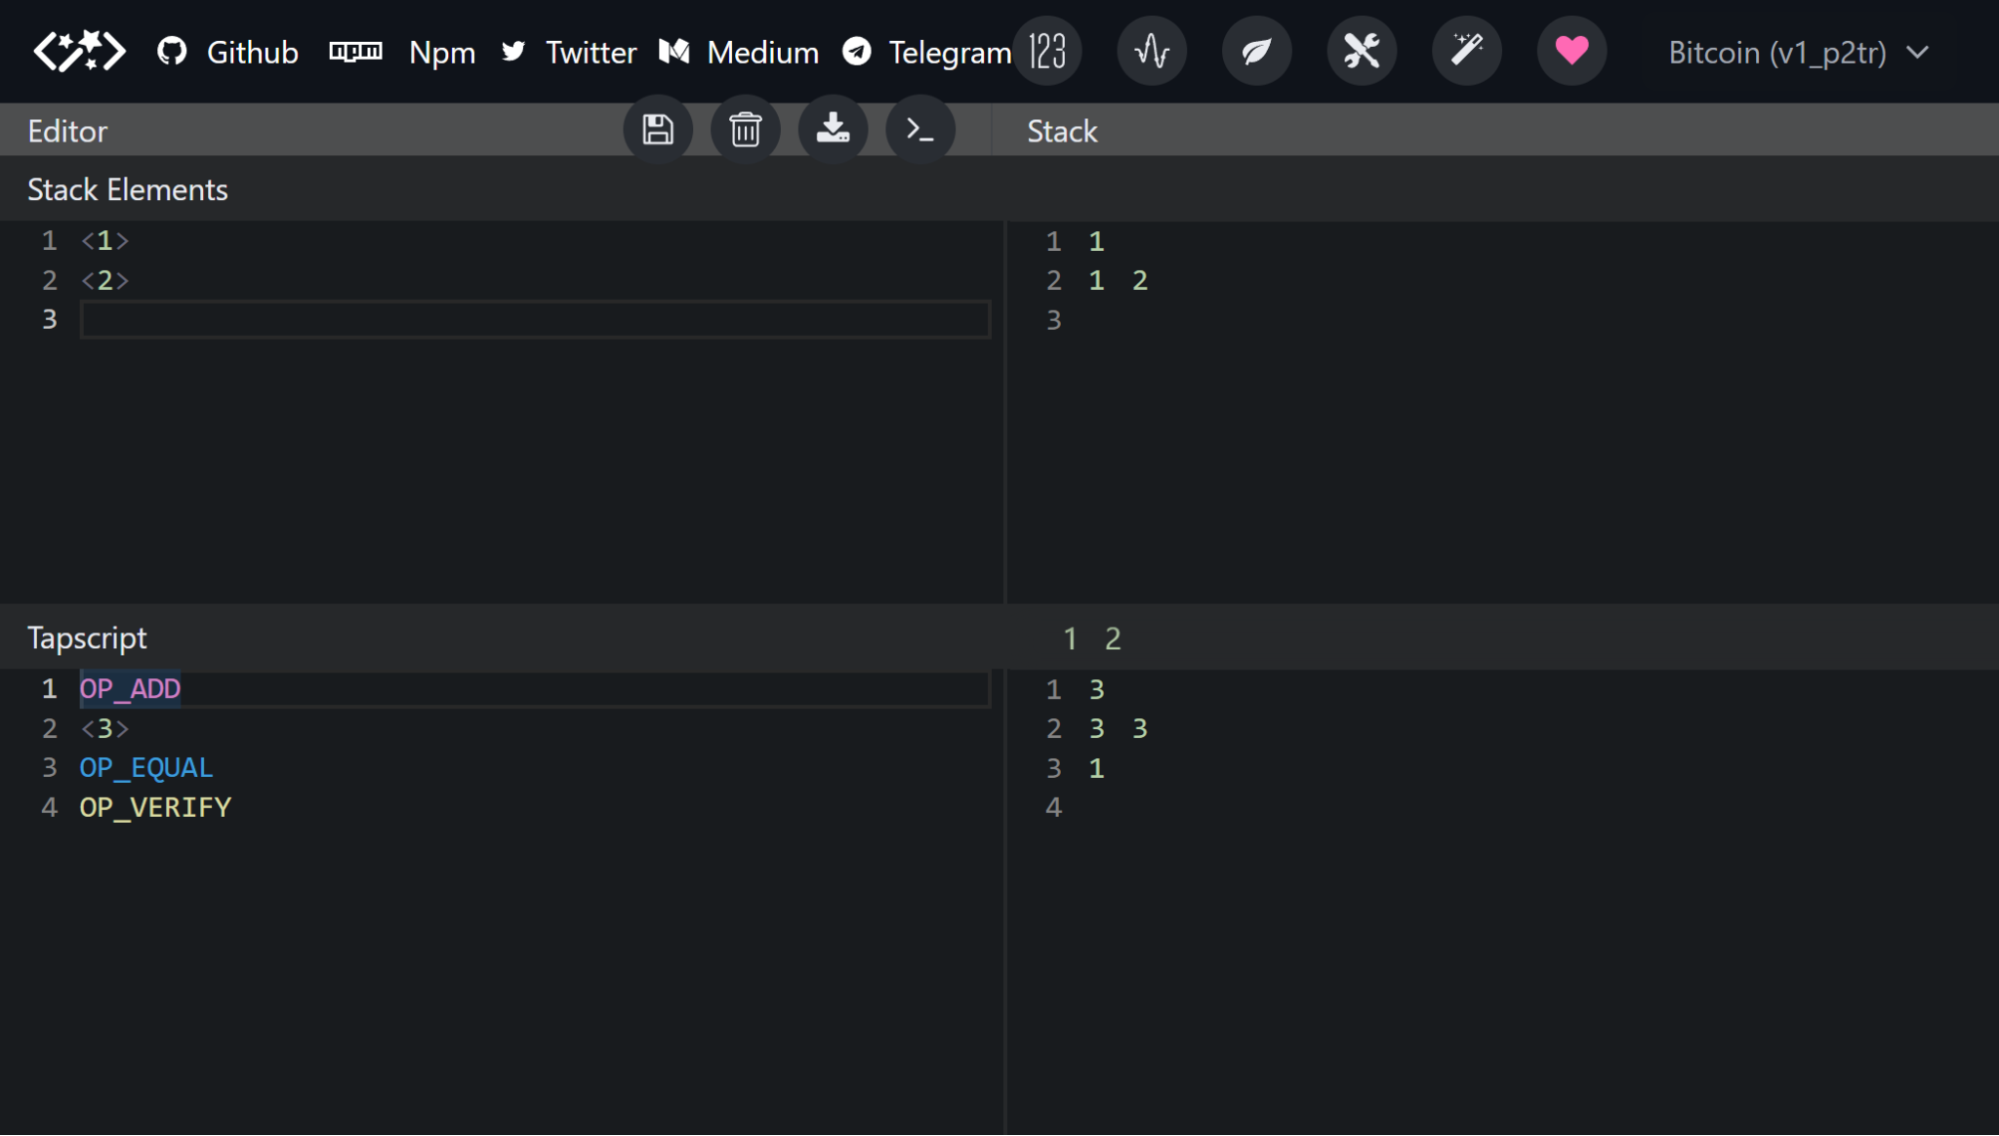
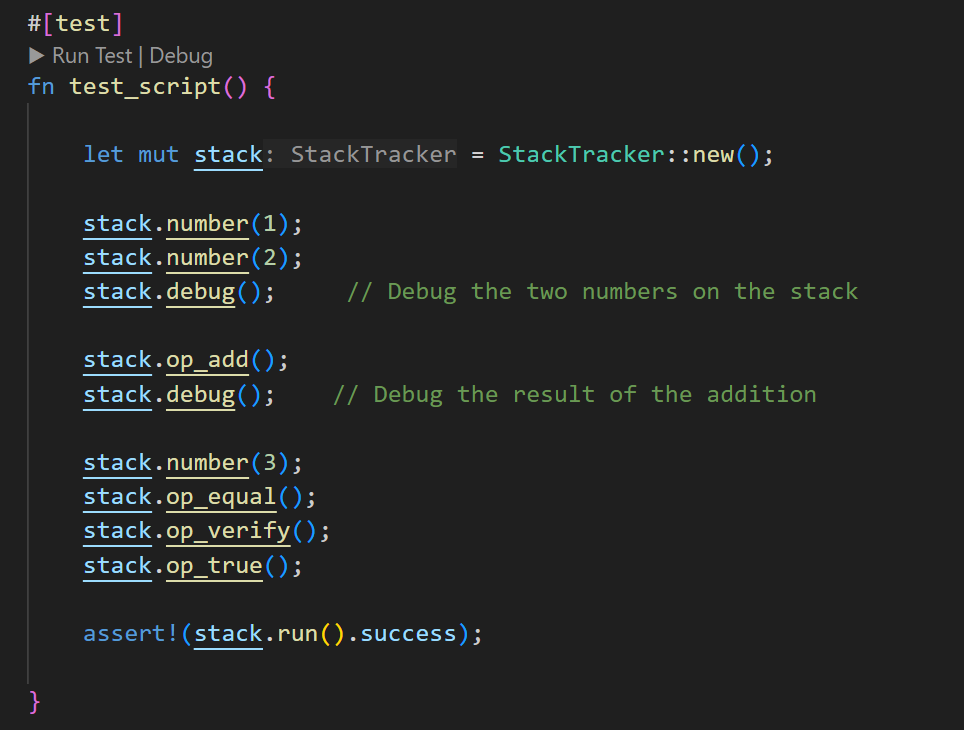
The main struct of the library is StackTracker.
To use it, you need to create a mutable instance and then operate with it. Almost all Bitcoin Script opcodes are
mapped to functions, and calling these functions adds the corresponding operations to the script sequence.
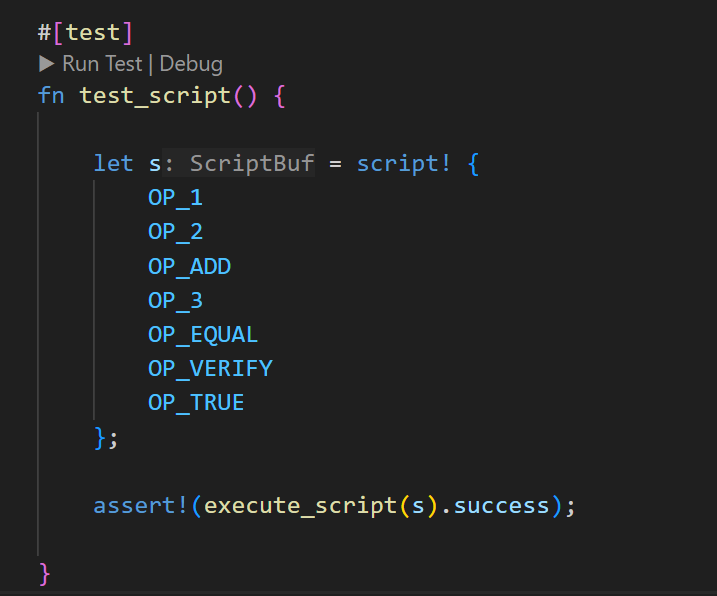
An equivalent code to the previous image is the following:
Debugging
As mentioned earlier, one of the main benefits of using this library is the debug() function.
Each time debug() is called, it executes the scripts up to that point and outputs the following elements:
- Maximum number of elements on the stack: After the first call, the maximum is 2, and when called again. it remains at 2 even when the current stack size is 1. This is helpful when writing algorithms that require available space, given that the maximum stack size is 1,000.
- Last opcode: Shows the last operation executed.
- Current state of the stack and alt-stack:
- The first column is an auto-incrementing ID for each variable.
- The second column is the number of stack elements that the tracked variable uses (this will be explained in more detail).
- The third column is the name or description of the variable.
- The fourth column shows the actual value on the stack.
The output of executing the test above:
Last opcode: "OP_PUSHNUM_2"
======= STACK: ======
id: 1 | size: 1 | name: number(0x1) | 1
id: 2 | size: 1 | name: number(0x2) | 2
==== ALT-STACK: ====
Max stack size: 2
Last opcode: "OP_ADD"
======= STACK: ======
id: 3 | size: 1 | name: OP_ADD() | 3
==== ALT-STACK: ====
Tracking Variables
Another key purpose of this library is to track elements on the stack as if they were variables.
To achieve
this, operations on the stack returns a StackVariable struct.
For example these two numbers can be tracked as
variables.

This will place the number 1234 on the stack and on top, followed by the number 2222.
Then if we call stack.move_var(first_var) it will move the number 1234 to the top.
Internally, this works by placing the depth of that element on the stack and then calling OP_ROLL.
Tracking just one element in the stack may not seem very useful, but let’s see another example using the number_u32 function. This function is designed to generate the 8 nibbles of a u32 number as one variable (If you haven't, please refer to the previous article to understand why we are using nibbles). This function places 8 elements on the stack for each number but groups them conceptually as one variable.

Here’s how the debug trace looks:
id: 1 | size: 8 | name: number_u32(0xdeadbeaf) | deadbeaf
id: 2 | size: 8 | name: number_u32(0x12345678) | 12345678
Now, when we call stack.move_var(first_var) it will move the variable to the top, executing 8 OP_ROLL operations with the correct positions for each element, while accounting for how moving these elements affect the stack. While this is possible to do manually with auxiliary offset tracking, handling many elements on the stack becomes unmanageable.
Similarly, there is also a copy_var function, which will do OP_PICK instead of OP_ROLL.
This outputs:
======= STACK: ======
id: 2 | size: 8 | name: number_u32(0x12345678) | 12345678
id: 1 | size: 8 | name: number_u32(0xdeadbeaf) | deadbeaf
id: 3 | size: 8 | name: copy(number_u32(0x12345678)) | 12345678
==== ALT-STACK: ====
Alt-Stack
There are two other helper functions: to_altstack and from_altstack. These functions move the entire variable to and from the alt-stack when the element is on the top of the stack.
Take a look at this example and its debug output:
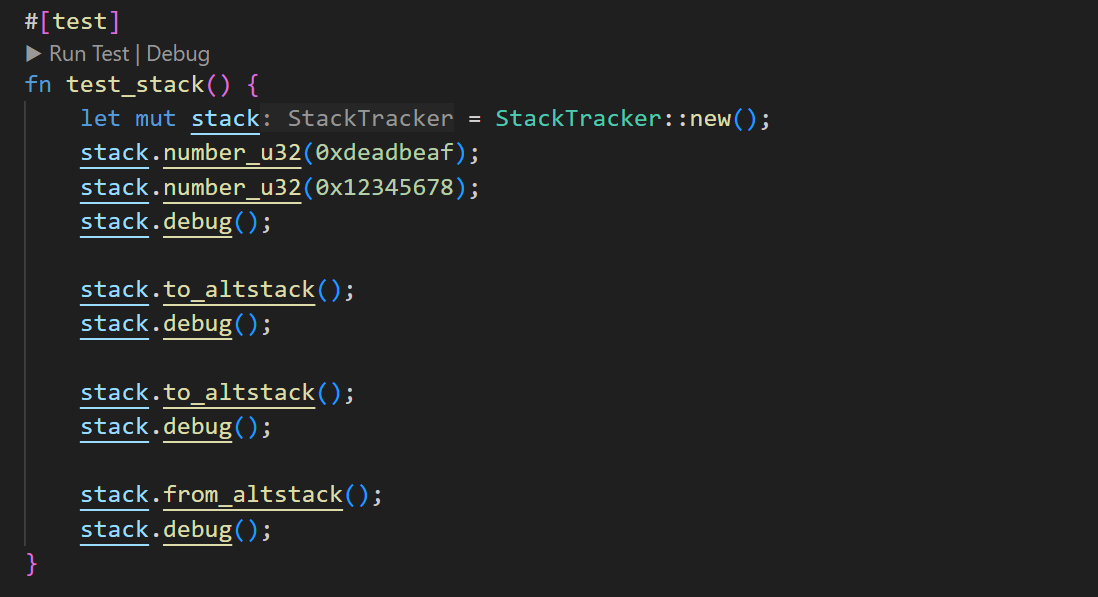
id: 1 | size: 8 | name: number_u32(0xdeadbeaf) | deadbeaf
id: 2 | size: 8 | name: number_u32(0x12345678) | 12345678
==== ALT-STACK: ====
======= STACK: ======
id: 1 | size: 8 | name: number_u32(0xdeadbeaf) | deadbeaf
==== ALT-STACK: ====
id: 2 | size: 8 | name: number_u32(0x12345678) | 12345678
======= STACK: ======
==== ALT-STACK: ====
id: 1 | size: 8 | name: number_u32(0xdeadbeaf) | deadbeaf
id: 2 | size: 8 | name: number_u32(0x12345678) | 12345678
======= STACK: ======
id: 1 | size: 8 | name: number_u32(0xdeadbeaf) | deadbeaf
==== ALT-STACK: ====
id: 2 | size: 8 | name: number_u32(0x12345678) | 12345678
(One detail about how the debug is displayed: the last element on the STACK is shown at the bottom, while the last element on the ALT-STACK is put on top. This is intentional, as it provides a clearer visual experience when debugging interactively. When an element is moved to the alt-stack, the legend shifts up one row, making it easier to follow the changes)
Accessing Parts
Sub Indexes
Another interesting feature of the library is the ability to access individual elements of a variable using sub-indexes. This type of access is essential when performing operations on the nibbles of a u32 number.
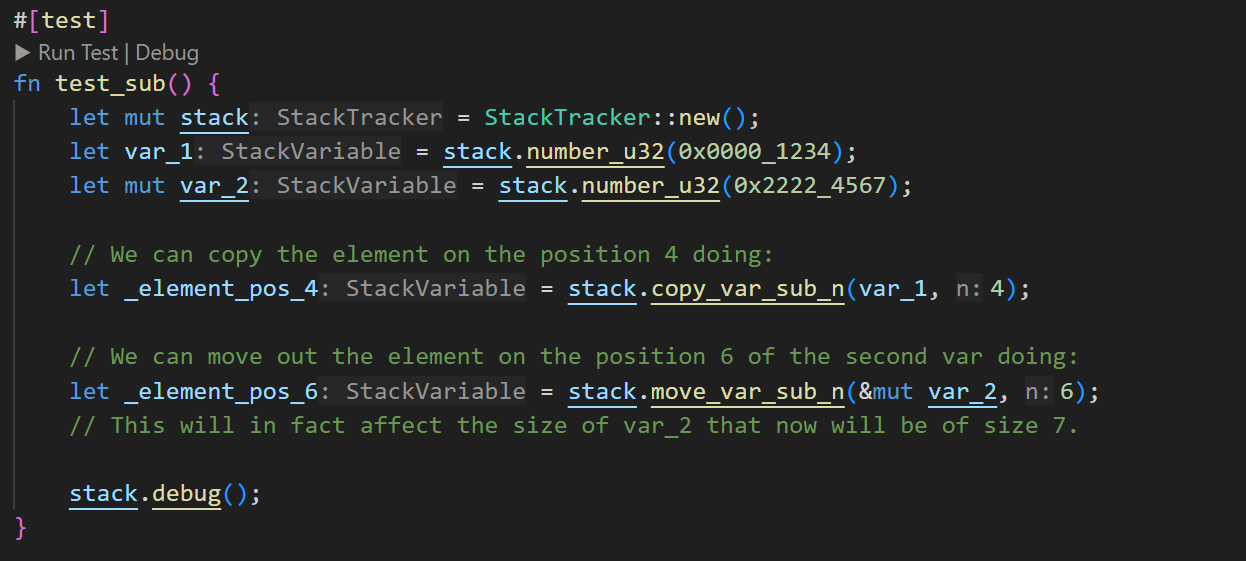
Last opcode: "OP_ROLL"
======= STACK: ======
id: 1 | size: 8 | name: number_u32(0x1234) | 00001234
id: 2 | size: 7 | name: number_u32(0x22224567)| 2222457
id: 3 | size: 1 | name: unknown | 1
id: 4 | size: 1 | name: unknown | 6
Explode and Join
Another way to manipulate the elements of a variable (or create one) is by using explode() and join(). The function explode() takes the variable on top of the stack and splits it into a vector of variables, each representing an individual element. For example, if we had a u32 variable of size 8, after calling explode(), we would have 8 variables, each of size 1. Both functions are virtual, meaning they do not actually modify the stack or generate any opcode but rather alter the semantic representation, which can be useful in some cases.
The function join() takes a variable and combines it with the following one, join_count() will do the same but repeated n times. This becomes helpful when we need to reconstruct a u32 number after creating one as result of element by element computations.
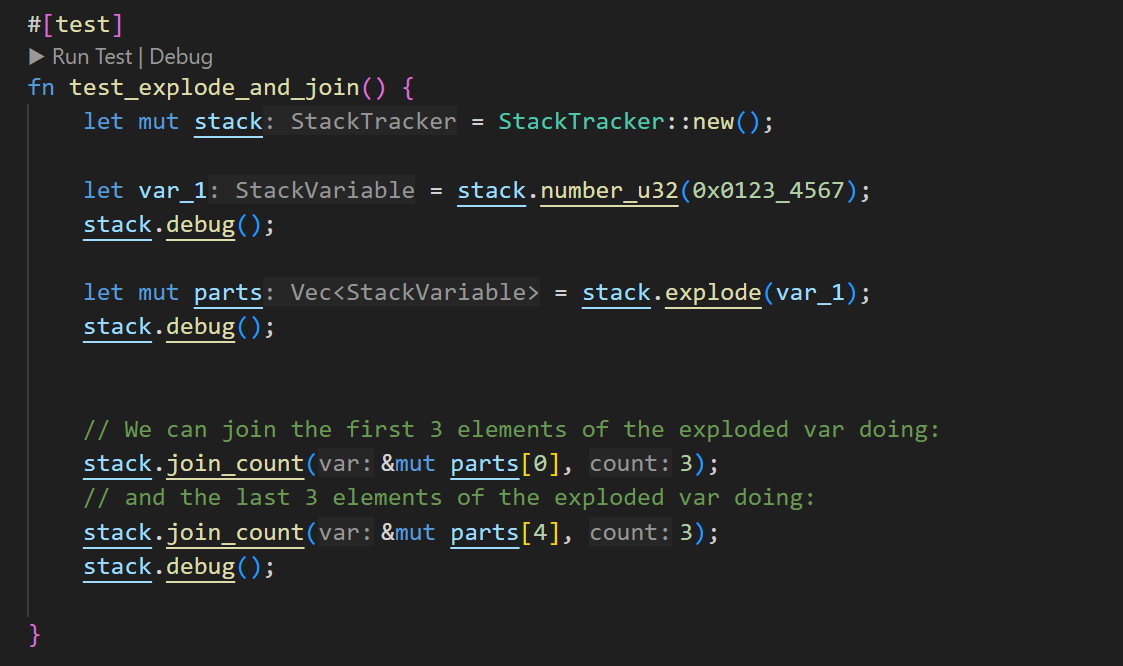
Last opcode: "OP_PUSHNUM_7"
======= STACK: ======
id: 1 | size: 8 | name: number_u32(0x1234567) | 01234567
Max stack size: 8
Last opcode: "OP_PUSHNUM_7"
======= STACK: ======
id: 2 | size: 1 | name: number_u32(0x1234567)[0] | 0
id: 3 | size: 1 | name: number_u32(0x1234567)[1] | 1
id: 4 | size: 1 | name: number_u32(0x1234567)[2] | 2
id: 5 | size: 1 | name: number_u32(0x1234567)[3] | 3
id: 6 | size: 1 | name: number_u32(0x1234567)[4] | 4
id: 7 | size: 1 | name: number_u32(0x1234567)[5] | 5
id: 8 | size: 1 | name: number_u32(0x1234567)[6] | 6
id: 9 | size: 1 | name: number_u32(0x1234567)[7] | 7
Max stack size: 8
Last opcode: "OP_PUSHNUM_7"
======= STACK: ======
id: 2 | size: 4 | name: number_u32(0x1234567)[0] | 0123
id: 6 | size: 4 | name: number_u32(0x1234567)[4] | 4567
(Note that the last opcode remains PUSHNUM_7, because as mentioned earlier, explode() and join() do not affect the script or the stack, only its representation)
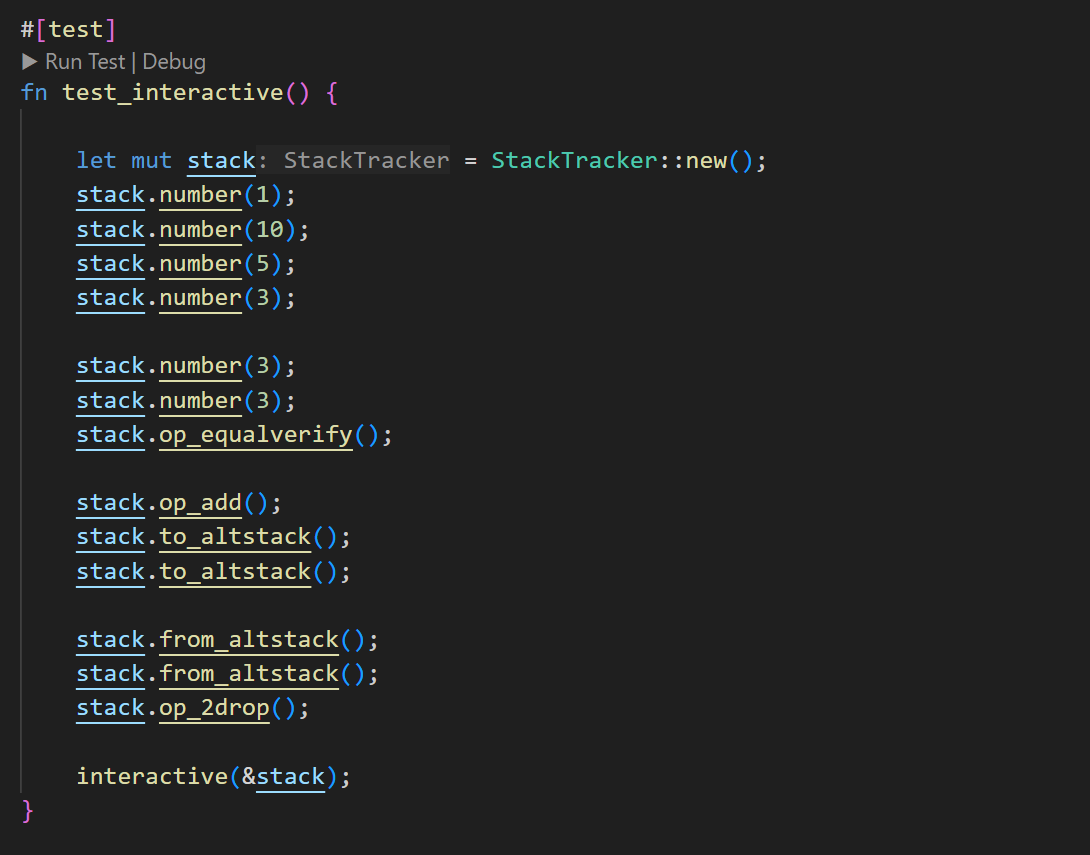
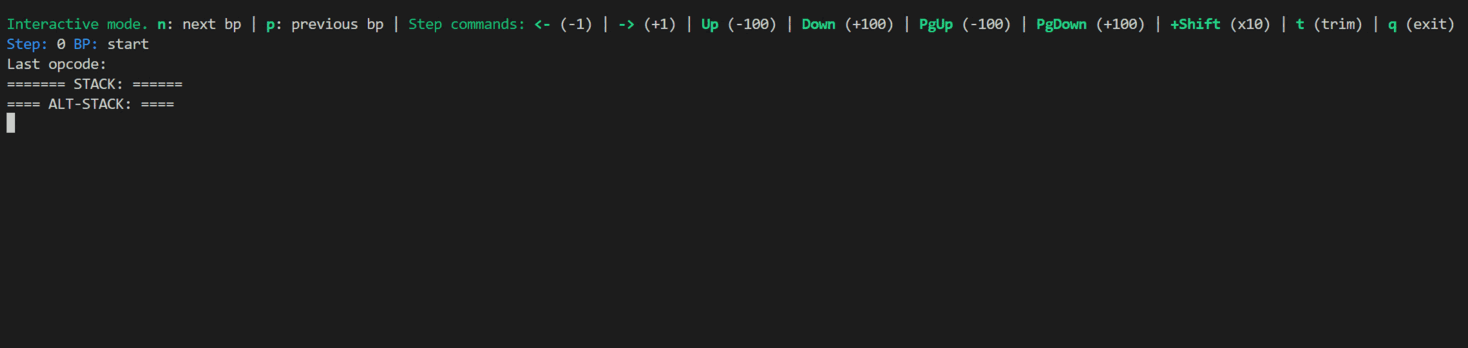
Interactive Debugging
The interactive debug console allows step-by-step debugging, enabling you to go back and forth between operations while observing how the stack is modified.
To use the interactive functionality, you need to build the project with the interactive feature enabled, and then
call interactive(&stack).
Take a look at this example and the output it produces:

Breakpoints
When writing large algorithms (for example, SHA56 contains over 300k opcodes), stepping through one operation at a time is not practical. To address this, you can define named breakpoints that allow you to jump directly to a specific part of the scripts and debug only that section.
Here’s an example of how to use the breakpoints:
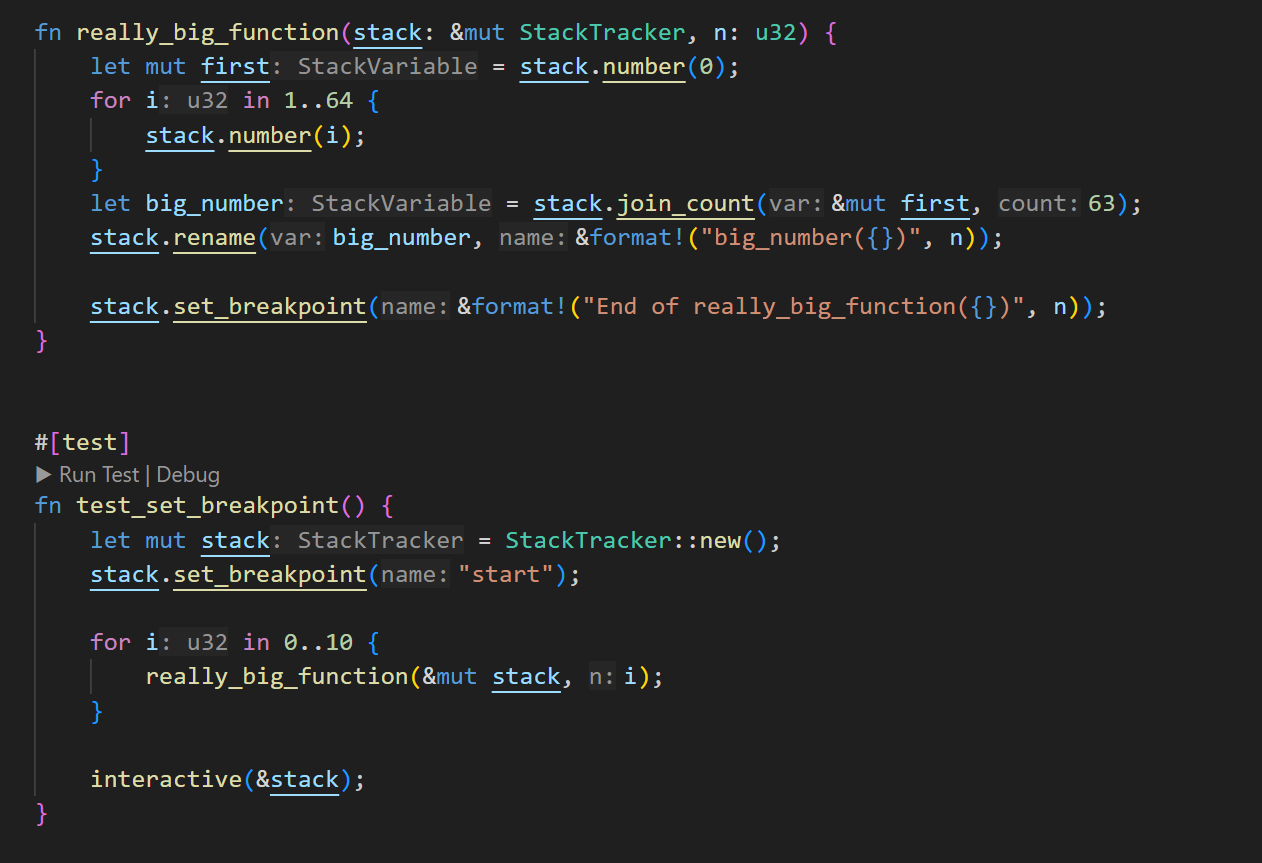
And the result of using breakpoint in the interactive console. You can see the effect of pressing (n) and (p) to jump to the next and previous breakpoints, and the arrow keys to inspect individual steps within the function.
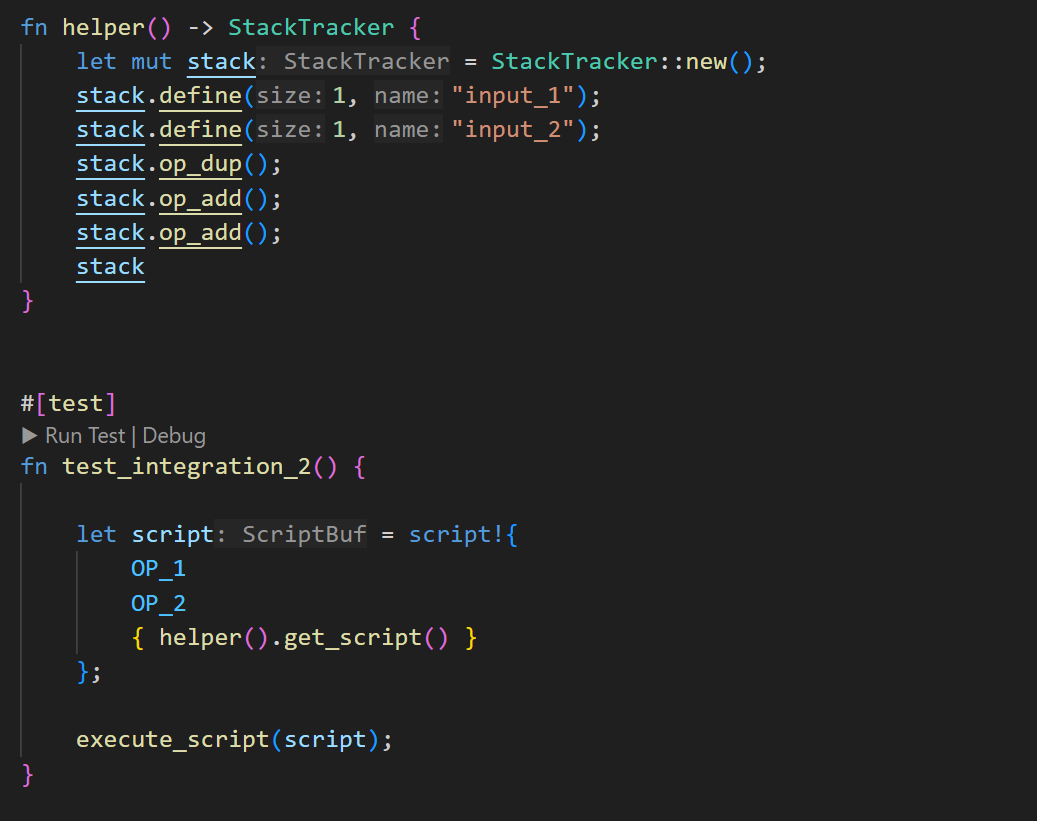
Integration With script! Macro
Since the library is built using script_exec, it is possible to integrate the scripts written with the script! macro as sub-functions, similarly, scripts written with the StackTracker can be used as a sub-function within a script! construction.
Let’s take a look at both examples:
First, using a custom script. As the function signature shows, it’s necessary to specify the number of elements that
will be consumed from the stack, whether it will output a new element, and the number of elements that will be
placed on the stack.
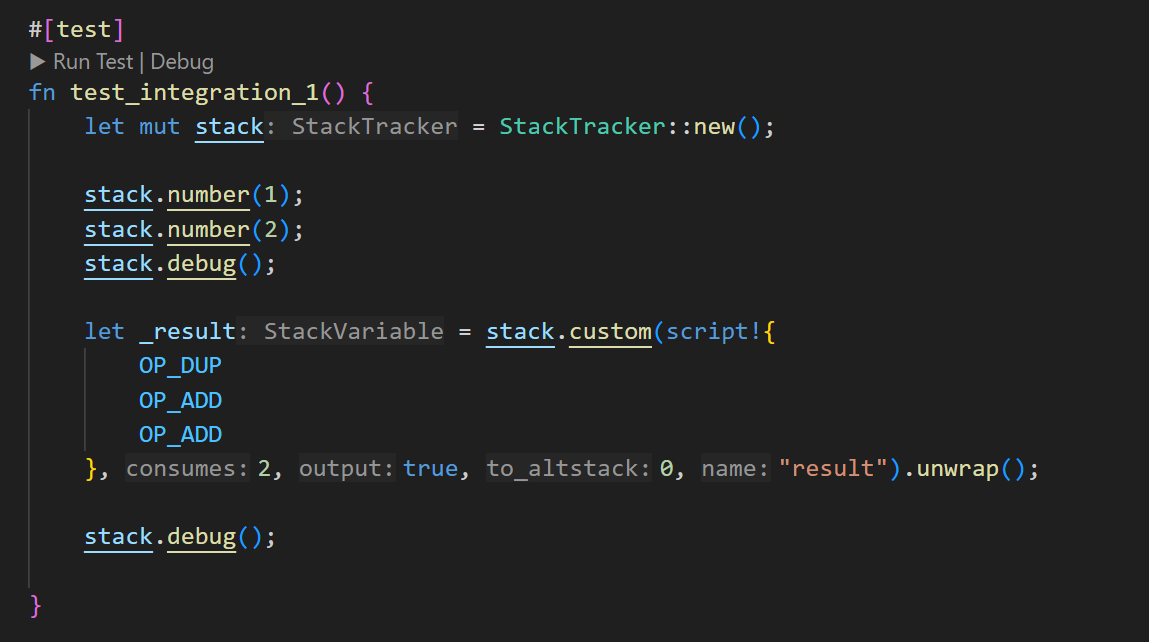
One caveat is that the contents of the script! passed as custom operation can not be debugged, it’s treated as a black-box operation:
======= STACK: ======
id: 1 | size: 1 | name: number(0x1) | 1
id: 2 | size: 1 | name: number(0x2) | 2
Last opcode: "OP_ADD"
======= STACK: ======
id: 3 | size: 1 | name: result
Now, let’s take a look at the opposite example where the script generated by StackTracker is used as a function:
Limitations
The library has some limitations, since the StackTracker does not execute code until run or debug is called, it is impossible to predict how the inputs will affect the workflow. As a result, operations that dynamically affect the position of the stack are not permitted.
OP_IFDUP: This operation is not allowed, as it duplicates the element on top of the stack if it’s not zero, which cannot be determined in advance.
OP_ROLL: It is not possible to use this operation directly because it dynamically alters the rest of the stack. The way to use this opcode is through move_var or move_sub_var provided by the library. Alternatively, it can be used as part of a custom operation where the part of the stack is contained and defined as arguments of the custom operation.
OP_IF/OP_ELSE/OP_ENDIF: For the same reason, since the branches of a conditional may modify the stack in different ways, it is not possible to use these directly.
- One option for conditionals is using OP_IF as a block with custom() where the stack changes are explicitly defined.
- Another option provided by the library is the open_if and end_if functions. open_if creates two new StackTracker instances, one for each branch. Both branches must affect the stack in the same way, and end_if needs to describe the modifications correctly. I added this feature recently and it’s a bit tricky to use, so it’s an area I plan to improve in the future.
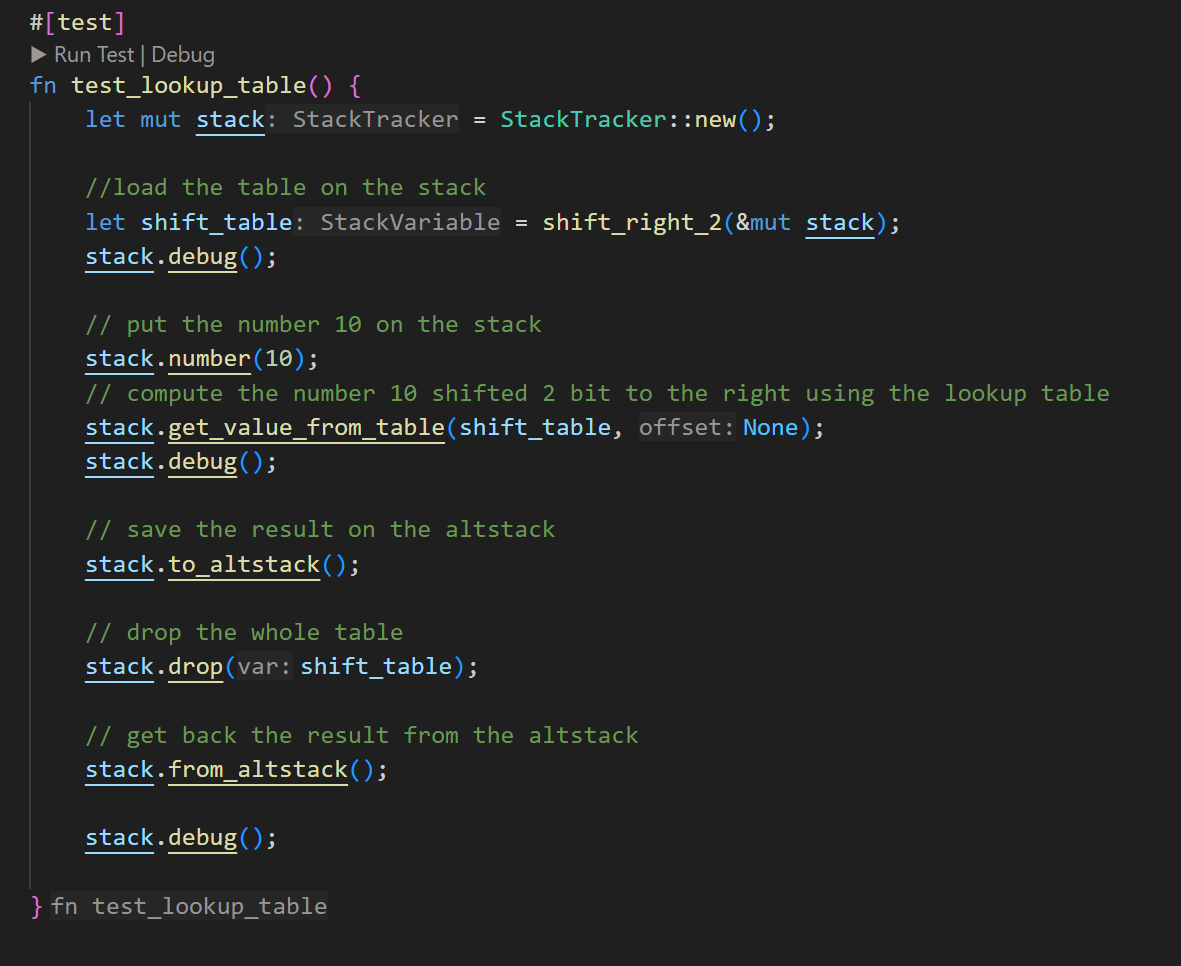
Lookup Tables
One of the primary uses of this library is to simplify the handling of lookup tables. For this purpose there is a function called get_value_from_table().
The idea is to generate a variable on the stack containing all the elements of the lookup table, then place the element that needs to be found, and call this function.
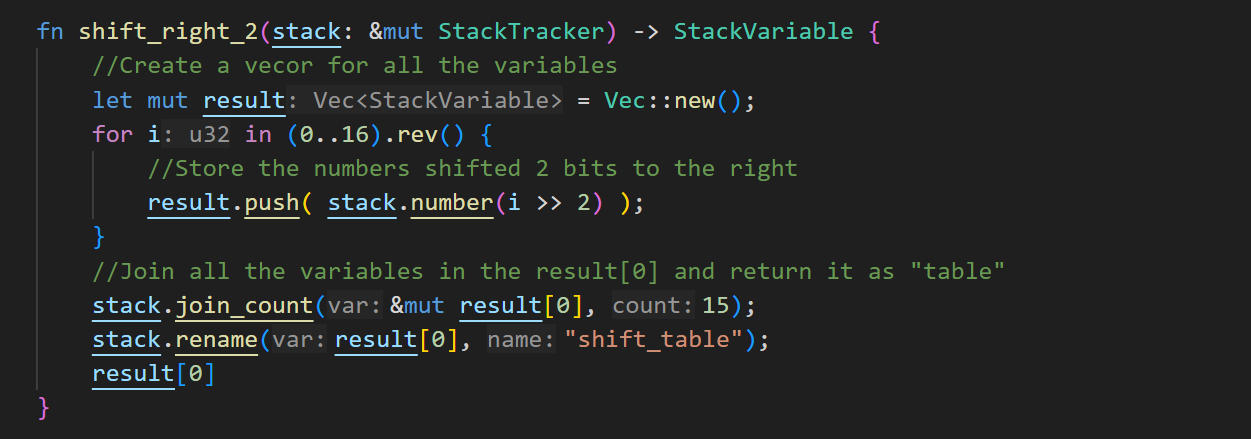
Let’s take the lookup table for shifting two bits to the right (on a nibble) as an example.
Table Creation
To create a lookup table, we need to pre-calculate the result of the desired operation for every possible value. In this case we want the result of shifting 2 bits to the right.
Usage
Last opcode: "OP_0"
======= STACK: ======
id: 1 | size: 16 | name: shift_table | 3333222211110000
Max stack size: 17
Last opcode: "OP_PUSHNUM_10"
======= STACK: ======
id: 1 | size: 16 | name: shift_table | 3333222211110000
id: 17 | size: 1 | name: number(0xa) | a
Max stack size: 18
Last opcode: "OP_PICK"
======= STACK: ======
id: 1 | size: 16 | name: shift_table | 3333222211110000
id: 20 | size: 1 | name: from:(shift_table) | 2
Max stack size: 18
Last opcode: "OP_FROMALTSTACK"
======= STACK: ======
id: 20 | size: 1 | name: from:(shift_table) | 2
Summary
In this article I presented a new powerful script-building open-source library and script debugging tool, the Stack Tracker. The Stack Tracker library greatly simplifies the effort required to write and debug scripts. While the library is still a work in progress and there is plenty of room for improvement, I believe others can already benefit from using it. If you decide to do it, contributions and comments would be very welcomed.